Finiti ponti, festività e malanni di stagione, oggi vi parlo di tecnica fotografica: Low key e High key, due tecniche al prezzo di una.
Solitamente utilizzate nel mondo della moda e commerciale, sono entrate a tutti gli effetti come fotografie di chi vuole e sa distinguersi nel mondo della fotografia di eventi e non solo.
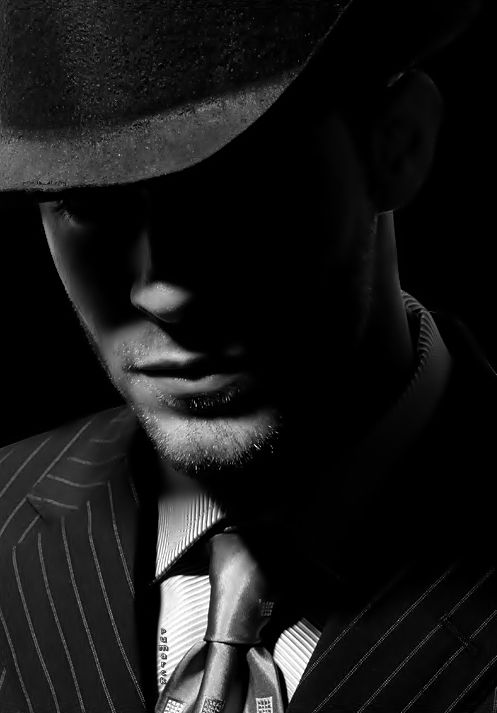
Low key e High key letteralmente significano fotografare in chiave bassa (per la Low key) e in chiave alta (per l’High key), cioè fotografare con toni scuri per la prima e in toni chiari per la seconda.
Low key implica una sottoesposizione dell’immagine volutamente desiderata: per effettuare bene la tecnica conviene scattare in studio con fondale nero e una sola fonte di luce. La tecnica che si usa per ottenere una fotografia in low key è quella del chiaroscuro usato in pittura, quindi il soggetto viene risaltato da un gioco sapiente di ombre e di luce per donare all’immagine drammaticità, introspezione del soggetto stesso e mistero.
Fondamentale scattare in condizioni di scarsa luminosità, quindi anche pareti bianche che fanno rimbalzare la luce potrebbero aggiungere riflessi indesiderati al nostro risultato finale. Bisogna avere, quindi, quanto più controllo possibile sulla scena. La fonte di luce solitamente viene posizionata a 35° o 45° in modo da ottenere la famosa luce Rembrandt, e dev’essere puntata solo sul soggetto. Si possono utilizzare anche pannelli riflettenti e luci di riempimento, ma bisogna farlo in modo quasi maniacale, altrimenti si rischia di non avere un buon risultato.
E’ possibile effettuare questa tecnica anche all’esterno se abbiamo una luce dura e ben direzionata sul soggetto come una luce finestra. L’attenzione e la pratica la fanno da padrone!

Per la tecnica in High key si utilizza luce ampia e diffusa: le immagini devono risultare del tutto prive di ombre (o quanto meno, devono essere ridotte al minimo) e i toni devono essere molto chiari. Necessità di avere una quantità di luce tale da rendere al soggetto un’aurea onirica, leggera, santificata nel suo piccolo.
La particolarità della tecnica High key è che il soggetto dev’essere avvolto dalla luce, situazione del tutto opposta alla precedente tecnica. Che si voglia scattare in esterni o in studio con la tecnica High key bisogna avere cura di evitare di posizionare sul soggetto una luce molto dura così da creare delle ombre nette sul lato opposto alla fonte di luce. Conviene, infatti, posizionare altre fonti di luce oppure dei pannelli riflettenti in modo da evitare forti ombre sul soggetto. Se si utilizza un’altra fonte di luce di riempimento bisogna che sia inferiore di uno stop rispetto alla fonte luminosa principale perché si possa creare quella quantità di ombre giusta per dare una tridimensionalità al soggetto che risulterebbe, altrimenti, schiacciato e non del tutto naturale.
Una tecnica molto usata nello still life (e non solo) è quella di posizionare dietro al soggetto una fonte di luce con davanti un pannello diffusore che ne filtri l’intensità così si da avere uno sfondo uniforme e pulito. Anche in questo caso bisogna poi andare a riempire le varie ombre con pannelli riflettenti, diffusori e luci di riempimento.
E’ una tecnica che si può effettuare anche in esterno ma non tutti gli ambienti sono adatti: ideale sarebbe un paesaggio innevato oppure una spiaggia con sabbia chiara o bianca per far risaltare il soggetto.
In entrambe le tecniche si delineano i contorni dei soggetti il risultato finale nella Low key sarebbe quello di donare al lettore una sensazione di mistero e drammaticità, mentre per l’High key quella di rendere più pulito il soggetto, più etereo. In entrambi i casi il soggetto è il protagonista unico e quasi totalmente indisturbato della scena

English version
High Key and Low Key
Now that long weekends, holidays and seasonal ailments are over, today I’m talking to you about photographic technique: Low key and High key, two techniques for the price of one.Usually used in the world of fashion and commercial, they have entered to all intents and purposes as photographs of those who want and know how to stand out in the world of event photography and beyond.
Low key and High key literally mean photographing in low key (for Low key) and in high key (for High key), that is, photographing with dark tones for the first and in light tones for the second.
Low key implies a deliberately desired underexposure of the image: to carry out the technique well it is best to shoot in a studio with a black backdrop and a single light source. The technique used to obtain a low key photograph is that of chiaroscuro used in painting, so the subject is highlighted by a skilful play of shadows and light to give the image drama, introspection of the subject itself and mystery.
It is essential to shoot in low light conditions, so even white walls that bounce light could add unwanted reflections to our final result. We must therefore have as much control as possible over the scene. The light source is usually positioned at 35° or 45° in order to obtain the famous Rembrandt light, and must be aimed only at the subject. You can also use reflective panels and fill lights, but you have to do it almost obsessively, otherwise you risk not having a good result.
It is also possible to carry out this technique outdoors if we have a hard and well-directed light on the subject such as a window light. Attention and practice are king!
For the high key technique, wide, diffused light is used: the images must be completely free of shadows (or at least, they must be reduced to a minimum) and the tones must be very clear. The need to have a quantity of light that gives the subject a dreamlike, light aura, sanctified in its own small way.
The peculiarity of the High key technique is that the subject must be surrounded by light, a situation completely opposite to the previous technique. Whether you want to shoot outdoors or in the studio with the High key technique, you must take care to avoid placing very hard light on the subject so as to create sharp shadows on the side opposite to the light source. In fact, it is advisable to position other light sources or reflective panels in order to avoid strong shadows on the subject. If you use another fill light source, it must be one stop lower than the main light source in order to create the right amount of shadows to give a three-dimensionality to the subject which would otherwise appear crushed and not entirely natural.
A technique widely used in still life (and not only) is to place a light source behind the subject with a diffuser panel in front that filters its intensity so as to have a uniform and clean background. Also in this case it is then necessary to fill the various shadows with reflective panels, diffusers and fill lights.
It is a technique that can also be carried out outdoors but not all environments are suitable: ideal would be a snowy landscape or a beach with light or white sand to make the subject stand out.
In both techniques the contours of the subjects are outlined, the final result in the Low key would be to give the reader a feeling of mystery and drama, while for the High key that of making the subject cleaner, more ethereal. In both cases the subject is the sole and almost totally undisturbed protagonist of the scene.